
Thinking about how to get more out of your space? Maybe you’ve got a business that needs more room, or you’re just trying to store things better at home. Well, a 20ft container might be the answer you’re looking for. It’s a pretty common size, and people are finding all sorts of ways to use them, not just for shipping. We’re going to look at how you can really make one of these containers work for you, from understanding its size to packing it up smart.
Key Takeaways
- A standard 20ft container offers about 160 square feet of external space and roughly 1,172 cubic feet of internal volume, making it a versatile option.
- To maximize storage, pack heavy items low, break down large furniture, stack items uniformly, and fill any empty gaps to stop shifting.
- These containers are used for many things, like tiny homes, small shops, site storage for businesses, and secure places for valuables.
- Built from strong steel with good locks, a 20ft container provides security and holds up well against weather, but be mindful of weight limits.
- Using a 20ft container is often a budget-friendly choice compared to building new structures, offering a durable and practical solution for various needs.
Understanding Your 20ft Container’s Dimensions
External Measurements and Footprint
So, you’ve got a 20ft container and you’re wondering about its actual size. It’s not just about the length; knowing the full picture helps you plan where it’ll go and how much space it takes up on the ground. The outside of a standard 20ft container is pretty straightforward. It measures 20 feet long, 8 feet wide, and 8 feet 6 inches tall. This means it occupies about 160 square feet of land. That’s the footprint, so make sure you have enough room for it, plus a little extra space around the sides for access or whatever else you might need. It’s a solid, dependable box, but it does take up a decent chunk of real estate.
Internal Usable Space
Now, the inside is where things get interesting. Because of the container’s walls, the usable space is a bit less than the external measurements. You’re looking at roughly 19 feet 8 inches of length, 7 feet 8.5 inches of width, and 7 feet 10 inches of height inside. This gives you about 150.6 square feet of actual floor space to work with. It might not sound like a huge difference from the outside numbers, but it really adds up when you’re trying to fit things in. Think of it like this:
| Dimension | External (Approx.) | Internal (Approx.) |
|---|---|---|
| Length | 20 ft | 19 ft 8 in |
| Width | 8 ft | 7 ft 8.5 in |
| Height | 8 ft 6 in | 7 ft 10 in |
This difference is important to remember, especially when you’re comparing it to other options like a 40 ft container, which offers significantly more internal room.
Volume and Cubic Capacity
Beyond just the floor area, there’s the volume to consider. A standard 20ft container can hold around 1,172 cubic feet of stuff. That’s a good amount of room, but remember, you can’t perfectly fill every single inch with items. Think of it like trying to pack a suitcase with oddly shaped things – there will always be some empty air pockets. So, while the cubic capacity is a key number, it’s good to be realistic about how much you can actually pack in.
Knowing these dimensions is the first step to making sure your container works for you. Whether you’re storing equipment, moving belongings, or setting up a workspace, understanding the exact space you have to work with prevents headaches later on.
Here are some key points to keep in mind:
- External footprint: About 160 sq ft.
- Internal floor space: Around 150.6 sq ft.
- Total internal volume: Approximately 1,172 cubic feet.
- Wall thickness: Accounts for the difference between external and internal measurements.
Strategic Packing and Loading Techniques for Your 20ft Container
Alright, so you’ve got your 20ft container, and now it’s time to actually get stuff into it. This isn’t just about shoving things in and hoping for the best. A little planning goes a long way here, and it can seriously make the difference between fitting everything you need and having to leave some things behind. Let’s get into how to pack smart.
Break Down Large Items
This is a big one, especially if you’re moving furniture. Think about that big couch or that bed frame. If you can take it apart, do it. A disassembled bed frame is way easier to slide into a corner than a whole assembled bed. It takes up less awkward space and fits better with other items. Just make sure you keep all the little bits – screws, bolts, whatever – together. Put them in a sealed bag, label it clearly with what it’s for, and maybe tape it to the main piece. You’ll thank yourself later when you’re trying to put it back together.
Stack Heavier Items First
This is pretty much a golden rule for packing anything, really. You want the heavy, sturdy stuff at the bottom. This creates a solid base for everything else. Plus, it stops lighter things from getting squashed. Imagine putting a stack of books on top of a pile of pillows – not a good look. So, think about your heaviest items, like appliances or big furniture pieces, and get them in first, usually towards the back of the container. This also helps keep the container balanced.
Use Uniform Packing Units
When you’re filling in the spaces, using boxes or crates that are roughly the same size is a game-changer. They stack neatly, like building blocks. Randomly shaped items leave weird gaps that are hard to fill. If you’re using boxes, try to get them in similar dimensions. This makes the whole load much more stable and uses the space way more efficiently. It’s like a puzzle, but one where all the pieces are designed to fit together.
Fill Gaps for Stability
Once you’ve got your big items and your boxes in place, you’ll probably have some empty spots. Don’t just leave them! These gaps are where things can shift around during transit, and that’s how damage happens. Use smaller items, blankets, old clothes, or even packing paper to fill these spaces. You want everything to be snug and secure, so nothing is rolling or tipping. A tightly packed container is a stable container.
Packing a container isn’t just about brute force; it’s about smart arrangement. Every inch counts, and by thinking about how items fit together, you can prevent damage and maximize what you can store.
Maximizing Storage Within Your 20ft Container
So, you’ve got this 20-foot container, and now the big question is how to fit everything you need inside without it becoming a chaotic jumble. It’s a common puzzle, really. You want to use every inch, but you also don’t want to spend ages digging for something later. Let’s talk about making that space work for you.
Create A Loading Plan Based On Item Size
Before you even think about putting anything inside, grab a notepad and sketch out a plan. Knowing the rough dimensions of your items is key. Think about how you’d pack a moving truck, but with more permanence. You want to create a stable, organized load that uses the entire volume. It’s not just about shoving things in; it’s about planning.
- Visualize the container’s interior: Imagine it like a giant puzzle. Where will the big pieces go? Where can the smaller ones fill in the gaps?
- Group similar items: Boxes of books can stack neatly, while oddly shaped furniture needs careful placement.
- Consider accessibility: What do you need to get to easily? Put those items closer to the door.
Ensure Even Weight Distribution
This is super important for stability, especially if the container might get moved. You don’t want it tipping over or shifting things around. Heavier items should always go on the bottom and towards the front (the end with the doors). This helps keep the center of gravity low and prevents lighter things from getting crushed.
- Bottom Layer: Load your heaviest, sturdiest items here. Think large appliances, heavy furniture like sofas or wardrobes, and dense boxes.
- Middle Layer: Medium-weight items can go on top of the heavy items. This could include tables, chairs, or more boxes.
- Top Layer: Lighter items, fragile goods, or things you need to access more easily can be placed on top.
Always try to balance the weight across the width of the container. If you put a heavy item on one side, try to place something of similar weight on the opposite side to keep things level.
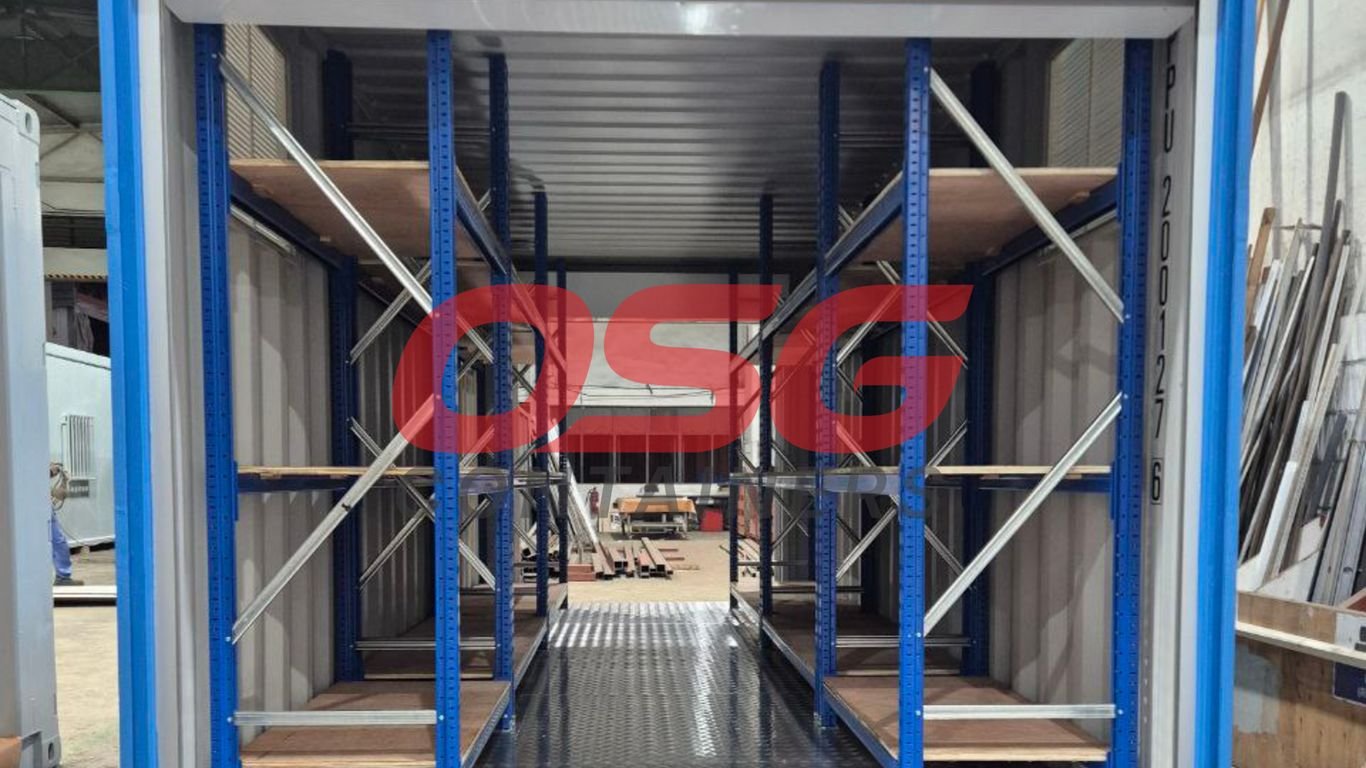
Utilize Vertical Space With Shelving and Racking
Don’t let all that height go to waste! Installing shelves or racking systems can dramatically increase your storage capacity. This is where you can really get creative.
- Sturdy Shelving Units: Opt for robust shelving that can handle the weight of your items. These can run along the long walls of the container.
- Pallet Racking: If you’re storing pallets or very heavy, uniform items, pallet racking is a great option. It’s designed for strength and efficiency.
- Wall Hooks and Rails: For long, awkward items like ladders, pipes, or tools, consider installing strong hooks or rails on the walls. This keeps them organized and out of the way.
Transforming Your 20ft Container
So, you’ve got a 20ft cargo container, and you’re thinking beyond just storage. That’s smart! These sturdy steel boxes are surprisingly adaptable. Forget just piling stuff in; let’s talk about turning your container into something really useful.
Convert Into A Workspace or Workshop
Imagine having your own dedicated spot to tinker, build, or create. A 20ft container is perfect for this. You can set it up as a workshop for your trade or a hobby space. Think about adding a solid workbench, good lighting, and plenty of outlets for your tools. Proper ventilation is a must if you’re dealing with dust or fumes. You could even split the space, maybe half for storing materials and the other half as your active work area. It’s a game-changer for getting projects done without taking over the garage.
Design A Garden Room or Home Office
Need a quiet place to focus away from the house? Or maybe a cool hangout spot in the backyard? A 20ft container can become a stylish garden room or a functional home office. Insulation is key here to keep it comfortable year-round. Add some windows for natural light and a door for easy access. You can paint it to match your home or make it stand out. It’s a great way to add extra living or working space without a huge construction project. Remember to check local rules about building permits, though.
Consider Multi-Use Furniture
When space is at a premium, especially in a container, furniture that does double duty is your best friend. Think about fold-down desks that disappear when you don’t need them, or benches with built-in storage. Even simple shelving units can be designed to hold seating. If you’re setting up a workspace, a modular desk system can be reconfigured as your needs change. For a garden room, a sofa bed can quickly turn a daytime office into a guest sleeping area. Every piece of furniture should earn its keep.
When planning any conversion, always consider the structural integrity. Cutting into the container walls or roof requires reinforcement to maintain its strength. Professional help is often recommended for modifications like adding windows or doors to an open-top container or any standard cargo container.
Smart Layout and Zoning Ideas for Your 20ft Container
Alright, so you’ve got your 20ft container, and now it’s time to figure out how to make it actually work for you. Just shoving stuff in there haphazardly is a recipe for disaster, trust me. You’ll end up with a jumbled mess and can’t find anything when you need it. The trick is to plan your interior layout before you even start loading. Think of it like setting up a room in your house – you wouldn’t just throw furniture around, right?
Plan Your Interior Layout Before Loading
Before anything goes in, grab a notepad or even use some masking tape on the floor to sketch out where things will go. What do you need easy access to every single day? What can be tucked away in the back? A good rule of thumb is to leave a clear central aisle, at least 3 feet wide, so you can actually walk around and get to stuff without playing contortionist. This makes a huge difference, especially if you’re going to be in and out of the container a lot.
Designate Zones For Specific Uses
Once you have your aisle planned, start thinking about zones. If you’re using it for storage, maybe one side is for shelving units holding boxes, and the other side is for larger items like furniture or equipment. If it’s a workshop, you’ll want a dedicated workbench area, maybe a spot for tools, and another section for materials. For a garden room or office, you’ll need distinct areas for working, relaxing, or even a small kitchenette. It’s all about giving everything a purpose and a place.
Here’s a quick breakdown of how you might zone it:
- Storage Focus:
- Wall-to-wall shelving on one side.
- Open floor space on the other for bulky items.
- Overhead hooks for hanging tools or seasonal gear.
- Workshop/Office Focus:
- Workbench along one wall.
- Storage cabinets or shelves for supplies.
- A small seating area or desk space.
Maintain A Central Aisle for Movement
I know I mentioned it before, but it’s worth repeating. That central aisle is your lifeline. Without it, your container becomes a frustrating maze. It’s not just about getting things in and out; it’s about safety too. You don’t want to be tripping over things or struggling to maneuver heavy items. Keeping this path clear makes the entire space feel much larger and more functional, no matter what you’re using it for.
Thinking about your container’s layout beforehand is like having a map for your space. It stops you from getting lost in clutter and makes sure that every square foot is working hard for you. It’s the difference between a chaotic storage unit and a well-organized, efficient space.
Wrapping It Up
So, that’s the lowdown on making the most of your 20-foot container. It’s pretty amazing how much you can fit and how useful these things are, whether you’re just storing stuff or turning it into a workshop or even a little office. Remember, planning is key. Think about how you pack, use all that vertical space, and break down big items. It’s not rocket science, but a little bit of thought goes a long way. With these tips, you can turn that metal box into a super functional space that really works for you. Happy packing!
Frequently Asked Questions
What are the exact outside and inside dimensions of a 20ft container?
A typical 20ft container measures about 20 feet long, 8 feet wide, and 8.5 feet tall on the outside. The inside space is a bit smaller due to the walls, usually around 19.5 feet long, 7.5 feet wide, and almost 8 feet tall. This gives you a good amount of room, but remember the walls take up a little bit of that space.
How can I fit more items into my 20ft container?
To pack more stuff, think smart! If possible, take apart large items like furniture. Always put the heaviest things at the bottom and use boxes or pallets to keep things neat and stacked well. Filling up any empty spaces with smaller items or padding is also key so nothing shifts around and gets damaged. It’s like playing a giant game of Tetris!
Besides storage, what are some creative uses for a 20ft container?
People get really creative with these containers! They are often turned into cozy tiny homes, handy backyard offices, small shops, workshops for hobbies, or even extra guest rooms. Because they’re strong and can be modified, they can become almost anything you need.
Are 20ft containers secure enough for storing valuable items?
Yes, 20ft containers are built to be very strong and secure. They are made of tough steel and come with strong locking mechanisms, making them a safe place to store valuable items. However, always ensure the locks are properly engaged and consider adding extra security measures if needed.
What’s the best way to organize items inside for easy access?
To make sure you can find things easily, plan your layout before you load. Create zones for different types of items, like tools, seasonal gear, or office supplies. Using shelves and keeping frequently used items closer to the door will make a big difference.
How do I make sure the weight is spread out evenly in the container?
Even weight distribution is important for stability. Place heavy items low down and towards the center or front of the container. If you put a heavy item on one side, try to balance it with a similarly weighted item on the other side. This prevents the container from tipping.


